Profile Tab Overview
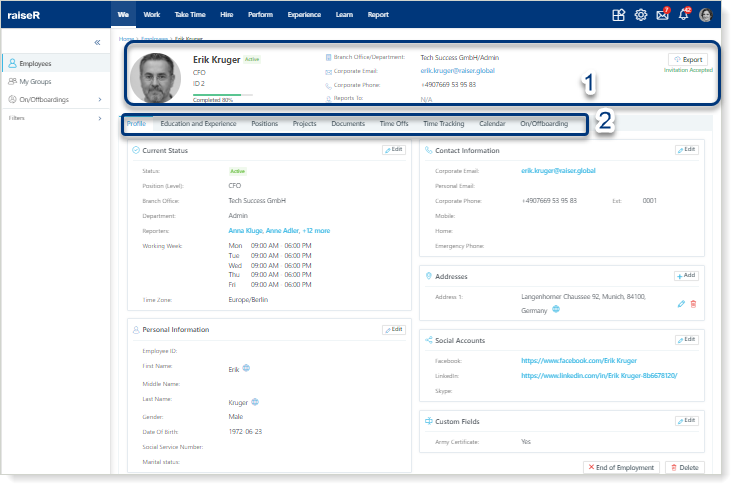
The Employee Profile tab is the initial and first view upon clicking on the Employee name card. The Profile section encompasses two key components: the Header part and the Personal Information displayed within organized blocks.
Important: Please note that your views and action permissions may vary depending on your Roles and Permissions given from account settings.
Employee Profile Header
Components of the Header:
- Employee Photo - Providing a visual representation of the employee;
- Employee Name - The full name of the employee;
- Position and Professional Level - Indicating the employee's role and level within the organization;
- Loading bar - Indicates the loading progress of certain information;
- ID - Unique identification number assigned to the employee, which is generated by the system;
- Branch Office and Department - Specifying the branch office and the department the employee is associated with;
- Corporate Email - Official email address provided by the organization;
- Corporate Phone - Official phone number provided by the organization;
- Reports to - Identifying the individual to whom the employee directly reports;
- Invite to raiseR or Re-invite button and Invitation status - Showing the status of the employee's invitation to use the system:
- Invitation Accepted - the invitation from raiseR has been accepted by the employee;
- Invitation Sent - invitation has been sent;
- Invitation not Sent - invitation hasn't been sent yet.

Inviting a User to raiseR
To invite a user to raiseR, follow these steps:
- Navigate to WE → Employee Profile;
- Click on this Invite to raiseR button to begin the invitation process;
- Choose the appropriate role type for the invited user:
- Multiple roles can be assigned to a single user. To manage user roles, refer to the Settings→ Roles and Permissions → Working with User Roles section. It's important to note that the Employee role is automatically assigned to every user.
Invitation Validity and Re-inviting
- The invitation sent to the user remains valid for 7 days. During this period, the status of the invitation will be Invitation Sent;
- In case the user does not accept the invitation within the 7-day window, the invitation will expire. To invite the user again, simply click the Re-Invite button;
- If the invitation expires (more than 7 days), you can still invite the user by using the Invite to raiseR button;
- Upon acceptance of the invitation by the user, the invitation status will change to Invitation Accepted.
Note: Only users with appropriate permissions can access the functionality to invite other users.
Important: It is essential to make sure that the email address is valid as if the email address is not verified the account won't get activated.
Uploading your photo
- Hover over the profile image area and click the Edit ✎ button to browse an image from your device;
- Next, select the Upload a Photo button;
- Use the provided options to resize, move, rotate the image, or make it black and white.
- Click Upload to upload a new image;
- Click Save or Cancel to save or discard the changes.
Next comes the Export button that allows you to export the profile data in one of the following formats: Excel (.xlsx), Pdf (.pdf) or Word (.docx).
Personal Information
The Profile tab, a vital component of the Employee Profile section, serves as a comprehensive repository of an employee's personal information. It comprises six well-organized blocks: Current Status, Personal Information, Contact Information, Addresses, Social Accounts, and Custom Fields. Depending on their assigned roles and permissions, employees may have the ability to view, modify specific blocks, or fully manage their entire profiles. Except for the Current Status block, you have the flexibility to manage and update each of these blocks to maintain data accuracy.
Note: Only people with the appropriate permissions can create Custom Fields, if they need to show any specific information about employees according to the company's regulations and needs, such as military service status, etc. For detailed instructions on creating custom fields, please refer to Creating Custom Fields.
The Globe icon adjacent to certain fields allows you to view localized values or modify and add new ones. Click the icon to explore localization options. For more details on localization, refer to this comprehensive article.

Termination of Employment
Note: It is possible to delete only those employees who have No Position status in the organization. To learn more about employees' statuses, see Introduction to People Management.
To conclude an employee's tenure at a company, you need to follow these steps:
- Navigate to the Employee Profile;
- Click on the End of Employment button at the bottom of the Profile page;
- Enter the necessary information in the required fields:
- Indicate the employee's last day of employment and the reason for contract termination. The reasons for ending employment are preset in Settings→ Customization → Key Properties.
4. You can choose the appropriate termination type and leave a comment if you have any
additional information to provide;
5. Click Save to confirm or Cancel to discard changes.
After saving, you can instantly generate documents by clicking Generate or No Need to finalize the termination process.
Note: Only authorized individuals can terminate employment contracts.
Important: The End of Employment button is not displayed on the administrator's profile page as the administrator role cannot be terminated.
Pseudonymization
raiseR utilizes the Pseudonymization functionality to protect employee privacy and safeguard sensitive data within the system.
- Navigate to the employee's profile page and click on the Pseudonymize button at the bottom of the page:
- Ensure you choose the employee with resigned or terminated status
3. Click the Save button to finalize the pseudonymisation process or the Cancel button to discard
any changes;
4. Verify your decision by selecting the YES button to proceed with pseudonymisation5. And you are done!
